November 15, 2025
How to Set Up and Edit Multicam in Adobe Premiere Pro
A practical step-by-step guide to organizing multiple camera angles and editing them together in Premiere Pro.
Switching between camera angles used to mean stopping playback, cutting manually, and hoping your sync was tight. It still feels that way in a lot of editing rooms. But Premiere Pro’s multicam feature lets you play through your sequence once and click or tap angles in real-time—the software cuts for you automatically. The setup takes maybe 20 minutes. The payoff is huge.
This guide walks you through the whole process, from getting your clips organized to actually editing with multiple angles. No fancy gear required—just your footage, some patience, and the steps below.
Why multicam editing matters
If you’re cutting anything with multiple camera angles—a podcast setup, an interview, a live performance—multicam editing changes how you work. Instead of stopping and starting playback, positioning clips, trimming cuts, and hoping everything lines up, you hit play and click the angle you want. Premiere Pro handles all the synchronization and cutting automatically.
The result is faster, more intuitive editing. You’re making real-time decisions about pacing and framing instead of fussing with the timeline.
What you’ll need
- Adobe Premiere Pro (works in any recent version)
- Multiple video clips, ideally already synchronized by a slate, timecode, or audio sync
- A new sequence where you’ll organize the angles
That’s it. You don’t need special codecs or fancy settings. Just clips and a plan.
Step 1: Prepare and synchronize your clips
Before you do anything in Premiere Pro, make sure your footage is ready.
Import your clips into your project. If you’ve already done that, great. If not, go to File > Import, select your video files, and drop them into your project panel.
Create a new sequence for organizing your angles. Give it a clear name like “Multicam Sources” or “3-Cam Edit.” You’ll use this sequence to set up the multicam source. Here’s how:
- Right-click in your Project panel.
- Select New Item > Sequence.
- Choose a preset that matches your footage resolution and frame rate (1080p 24fps, 4K 30fps, etc.).
- Name it something clear.
Place each camera angle on a separate video track. Drag your angle 1 clip to the V1 track, angle 2 to the V2 track, angle 3 to the V3 track, and so on. Line them up so they start at the same timeline position.
Place your audio on an audio track. If you have mixed audio (dialogue or a music track), put it on A1. If your clips have embedded audio, you can remove it from the video tracks or mute it to avoid doubling up.
Synchronize your clips
This is the most important step. Your angles need to be in sync, frame-for-frame. Premiere Pro gives you a few ways to do this:
If you have timecode, Premiere Pro will sync automatically using that. If not, use audio:
- Select all your clips on the timeline (video and audio tracks).
- Right-click and choose Synchronize.
- In the dialog, select “Audio track channel 1” as your sync method. Premiere Pro will look at the audio waveforms and align everything.
- Click OK.
This usually takes a few seconds. Once it’s done, check your timeline. Your angles should be lined up so they all play the same moment at the same time.
Pro tip: If sync goes sideways, undo and try again. If Premiere Pro can’t find audio (or your audio is too different between cameras), you might need to manually line up your clips by eye or use handles (extra frames at the start) that you can slip into place.
Prepare your audio
For your multicam source, you need audio that has no cuts in it. If you’re recording dialogue from multiple microphones (lavalier mics, camera audio, separate recorders), you can place them on separate tracks as long as they play continuously without cuts.
If your footage has cuts in the audio—for example, if you’ve already made edits or if your audio files don’t line up—you need to bounce them into a single continuous audio file. Right-click on your audio track and select Bounce to New Track. This creates a new file with all tracks mixed together. Once bounced, delete the original separate tracks and keep only the bounced version.
Important: Once you enable multicam, the audio track you’ve prepared becomes your master audio for the entire sequence. As you click between angles during editing, only the video switches—the audio stays consistent. This is exactly what you want for most workflows (like podcasts or interviews where you have a single continuous audio mix). If you need to switch audio sources along with video angles (for example, using different microphones for different speakers), you’d need a more advanced setup beyond standard multicam.
If your video clips have embedded camera audio that you don’t want, select it and delete it. Keep only your dialogue or master audio track.
Step 2: Create the multicam source sequence
Now you’ll “nest” your organized clips into a single multicam source. This is the clip Premiere Pro will use to let you switch between angles.
- Select all the clips on your timeline (all video tracks, plus your audio).
- Right-click and choose Nest.
- Name the new sequence something clear, like “Multicam 3-cam” or “Interview Source.”
- Click OK.
Premiere Pro creates a new nested sequence and puts it in your Project panel. This is still just a regular sequence at this point.
- Find the nested sequence in your Project panel (it should be at the top).
- Right-click on it and select Multicam > Enable.
That’s it. The nested sequence is now a multicam source clip. You’ll see a small indicator icon next to its name in the Project panel.
Troubleshooting: If you don’t see the “Multicam” option in the right-click menu, check that your nested sequence actually contains clips on multiple video tracks. The Multicam option only appears if Premiere Pro detects more than one video track.
Step 3: Create an editing sequence from the multicam source
Now you need a fresh sequence where you’ll actually do the editing (switching between angles).
The easiest way is to drag the multicam source clip to the “New Item” button in the Project panel (or right-click it and select “New Sequence”). Premiere Pro creates a new sequence with your multicam source on the timeline.
Alternatively:
- Create a new sequence (File > New > Sequence).
- Drag your multicam source clip from the Project panel onto the timeline.
Step 4: Enable multicam view and start editing
You’re almost there. Now you need to turn on the multicam view so you can see all your angles at once.
In the Program Monitor (where you see your playback), look for the wrench icon (⚙) or the plus sign (+) in the button area. Click it to open the Button Editor. Drag the “Toggle Multicam View” button to the monitor’s button bar if it’s not already there.
Click “Toggle Multicam View” to see all your angles at once in a grid.
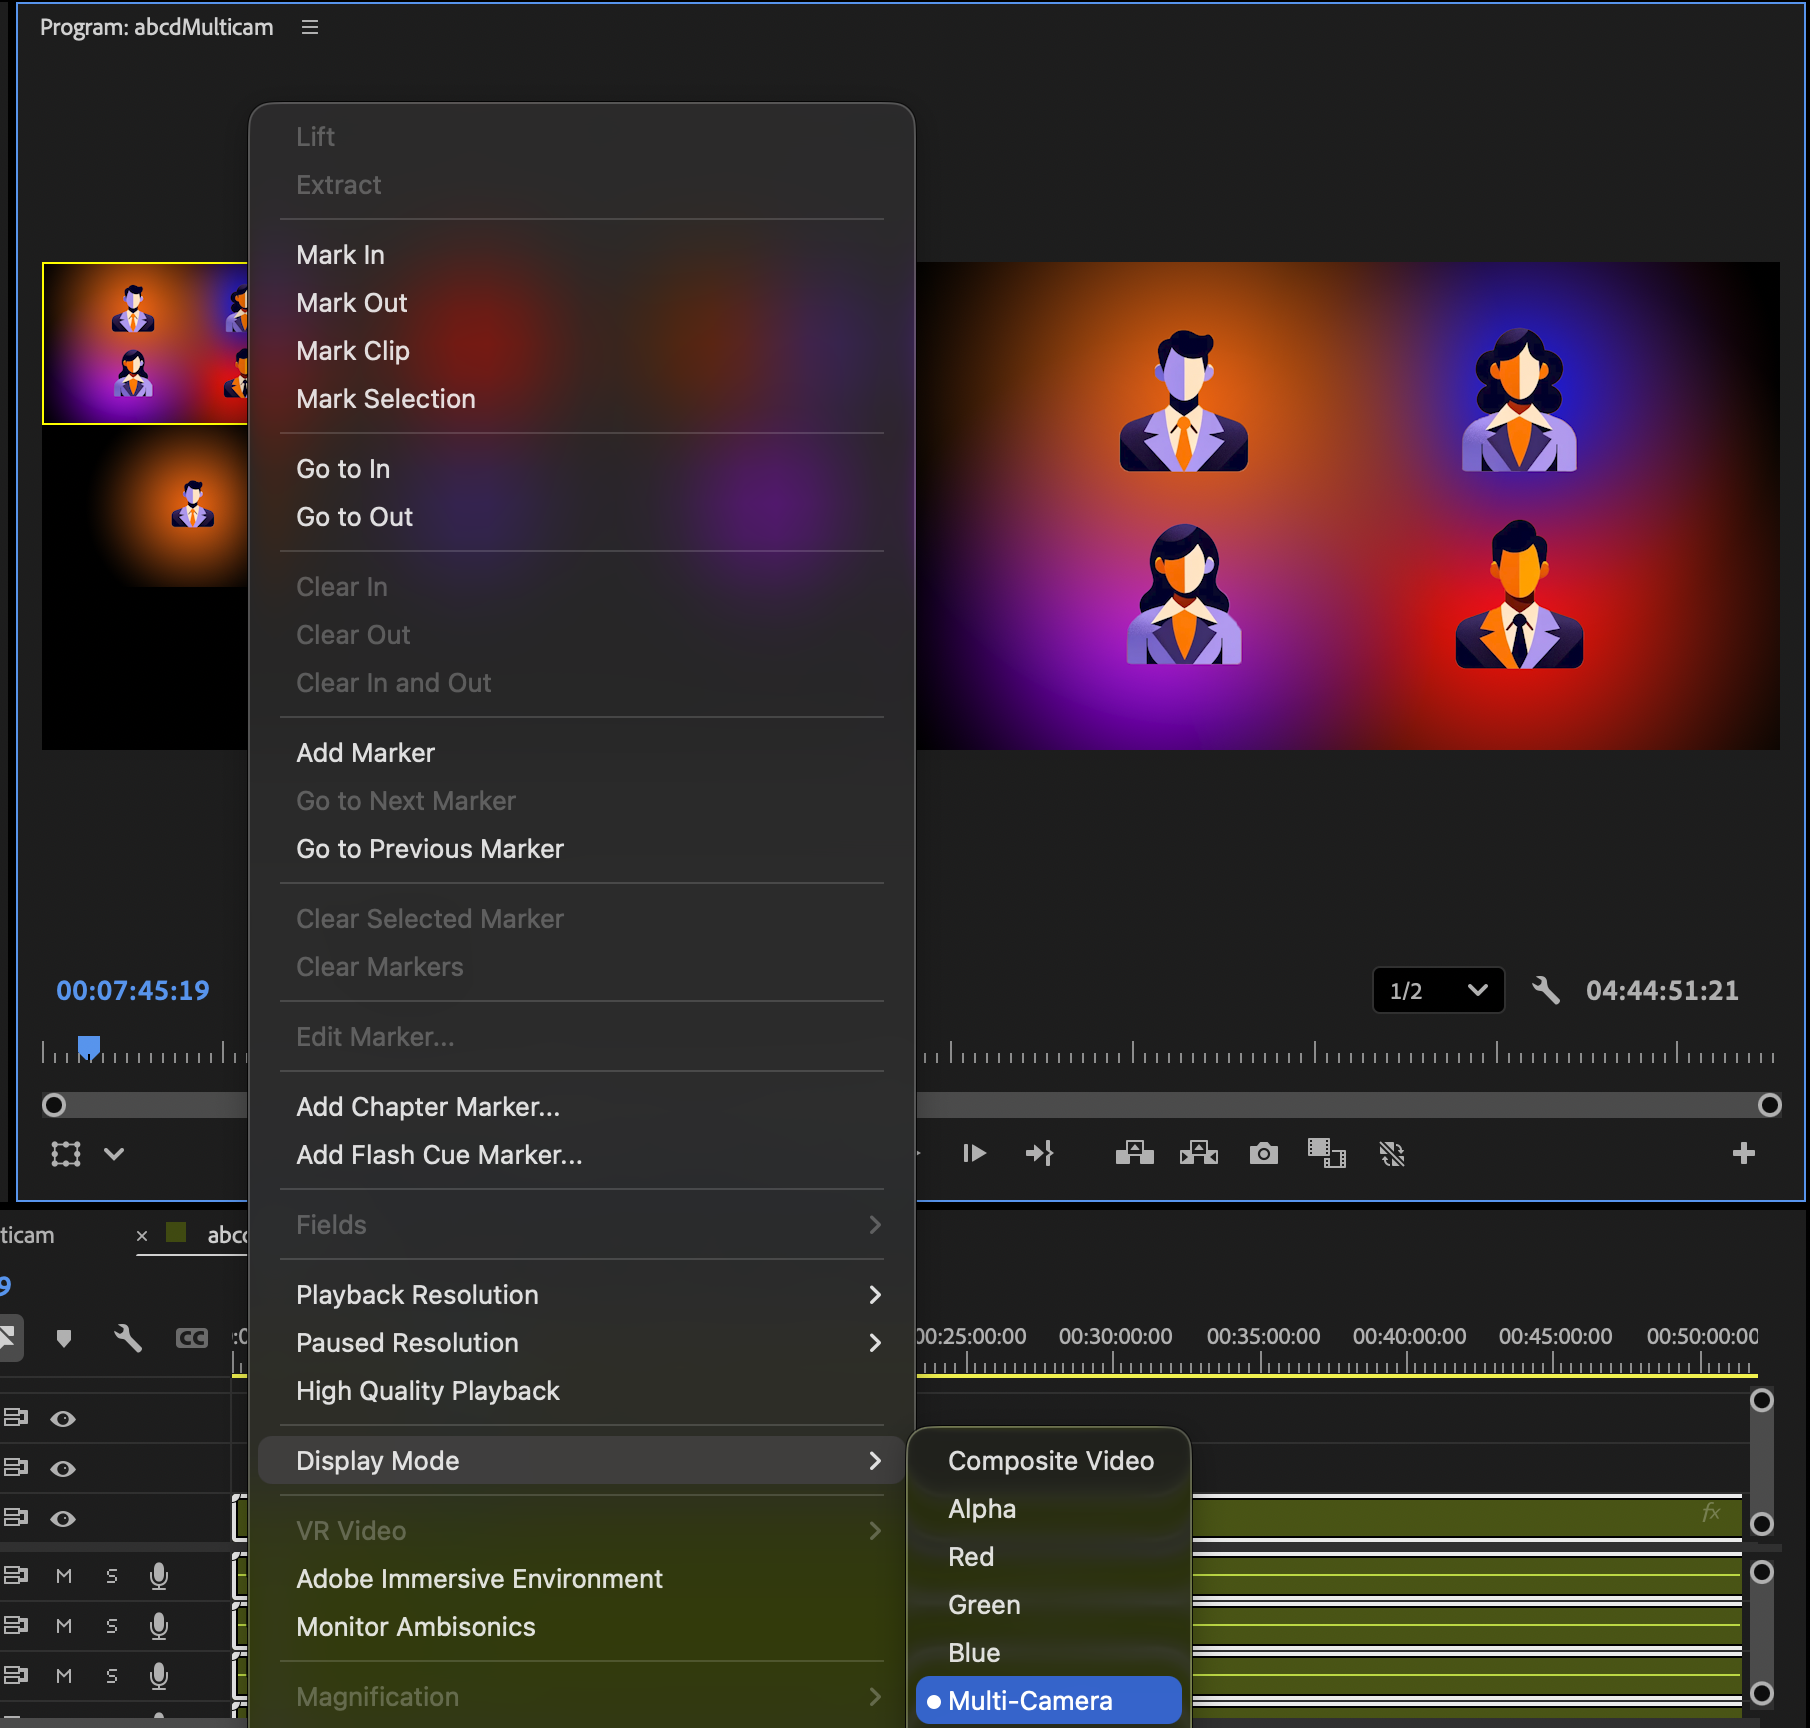
You can also use the Display Mode context menu in the Program Monitor to show all angles at once—this gives you a true multicam preview without needing the dedicated multicam view button.
Now play your sequence. As it plays, you have two ways to switch angles:
Method 1: Click on angles in the multicam grid. As it plays, click the angle you want to see. Premiere Pro automatically adds cuts to the timeline.
Method 2: Use number keys (faster). This is the power-user approach if you know your footage or have a script:
- Press 1 to cut to angle 1.
- Press 2 to cut to angle 2.
- Press 3 to cut to angle 3.
- And so on.
If you’re doing a podcast or interview where speakers alternate, this is way faster than clicking. You’ll develop a rhythm pretty quickly.
Exit multicam view when you’re done
Once you’re happy with your angle switching, you can return to normal editing view. Just click the “Toggle Multicam View” button again to turn it off. The cuts you made stay in place—you’re just switching back to the regular timeline view so you can do detailed tweaking or add effects.
Fine-tuning your edits
Once you’ve done a rough pass, you might want to tweak the cuts. Stop playback and use the regular timeline editing tools:
- Move a cut by clicking and dragging it left or right.
- Adjust timing by clicking on a clip and trimming it with the razor tool or by dragging the edges.
- Slip a clip if one angle is slightly out of sync (right-click the clip, select Slip, and drag).
The multicam clip itself stays intact. You’re just adjusting when the cuts happen.
Common gotchas and fixes
Your angles won’t sync.
This usually means your audio is too different or your timecode is off. Go back to the multicam source sequence, tweak your sync method, and redo the nest. It’s okay—you’re just working with a different version of the clip.
The multicam view shows the wrong angles or they’re too small.
You can resize the angle boxes in the multicam grid by dragging the dividers. If angles are in the wrong spots, remember that the order is based on which video track they’re on (V1, V2, V3, etc.).
A cut is landing in the wrong place.
Pause, use the timeline scrubber to find the exact frame where you want the cut, and manually adjust it. Multicam speeds things up, but fine-tuning is still manual work.
Alternative: Editing without multicam view
If the multicam grid isn’t your style, there’s another workflow. You don’t strictly need the visual grid to use multicam editing. Instead:
- Keep your angles on separate tracks in your editing sequence.
- Right-click one of the clips and select Multicam > Make Multicam Source.
- Click angles directly on the timeline to switch between them.
It’s slower than the keyboard shortcut method, and you lose the visual overview of all angles at once, but it works if you’re doing small sections or prefer timeline-based editing. Most editors, though, find the multicam grid view (with number key switching) much faster once they get the hang of it.
Save time with automation
Once you’ve set up multicam, the actual editing becomes much faster. For podcasts and interviews with lots of speaker turns, you can automate the cuts entirely.
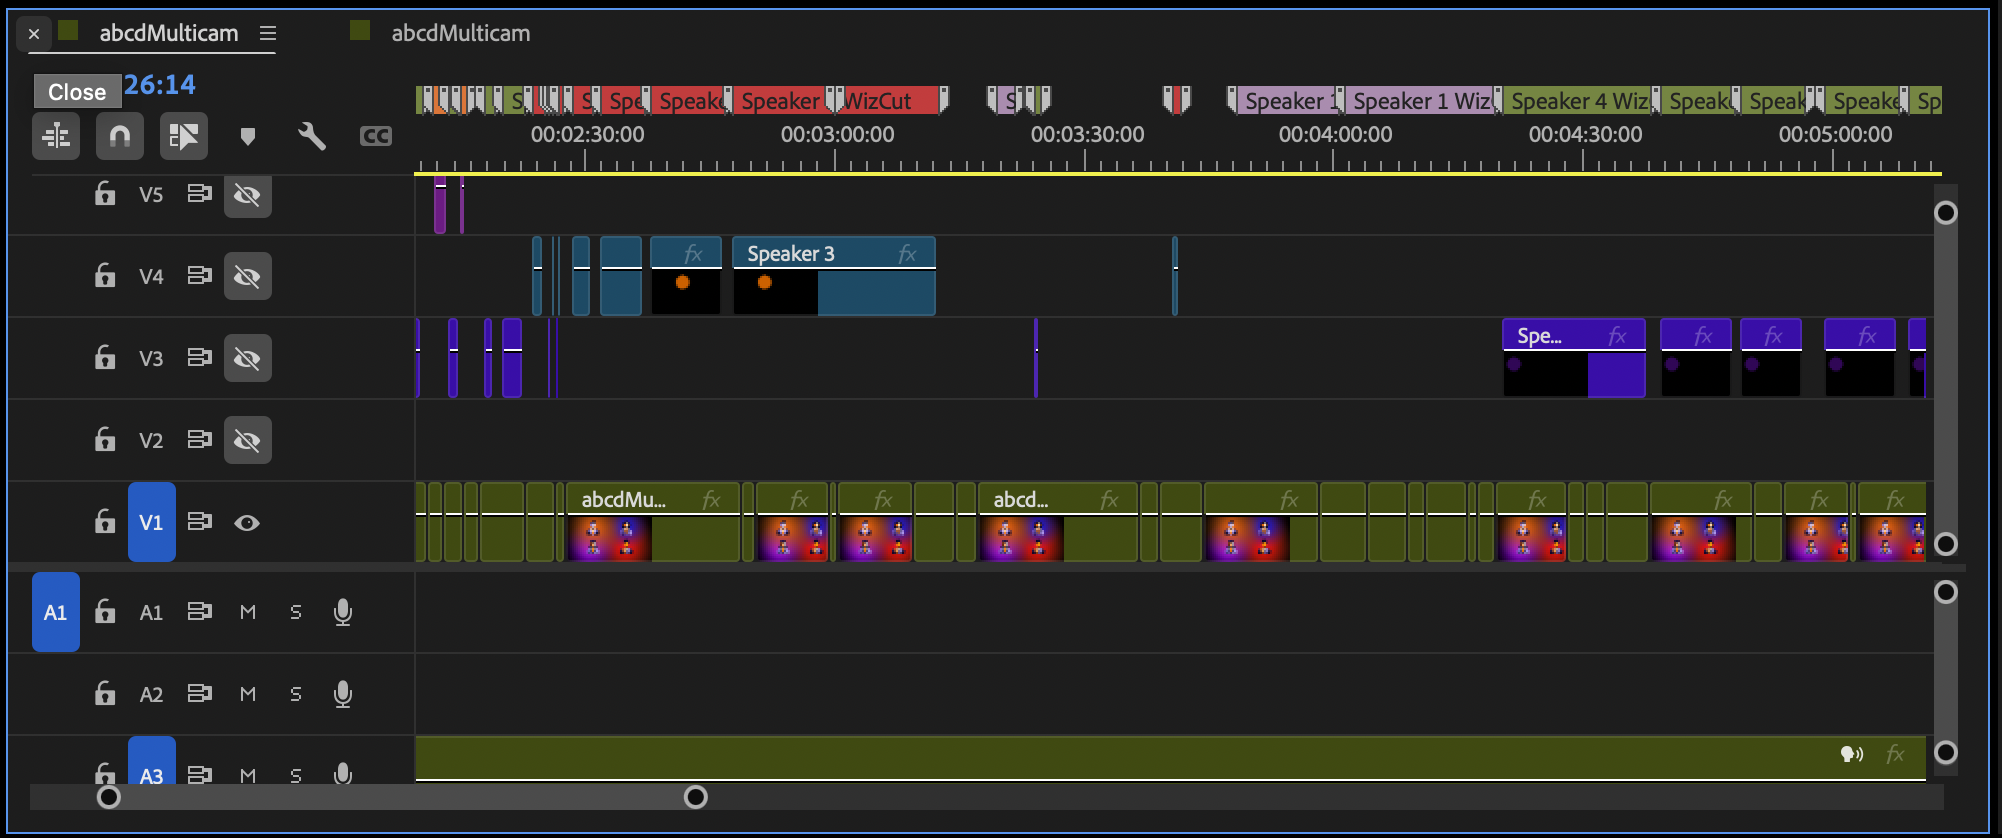
V1 shows a multicam edit, switching between camera angles—all perfectly in sync and easily switched. This is much cleaner and more flexible than managing individual tracks.
WizCut analyzes your audio, detects when speakers change, and automatically generates cuts in your multicam sequence. Instead of watching your footage and clicking angles manually, you review the AI’s suggested cuts and adjust anything that needs tweaking. Not a Premiere user? WizCut also runs as a standalone web app — upload your footage, review cuts in the browser, and download the final video.
If you’re interested in automating the camera switching, see our guide on editing multicam with WizCut. You can also check out our comparison of AI podcast editing plugins for Premiere Pro to see how WizCut stacks up against other options.
Pro tip: Label your angles clearly in the sequence name. 3-cam_interview_host-wide-guest-cam1-cam2 is way clearer than seq1.